Wednesday, January 4, 2017

pyRevit is blowing my mind

I am so sorry I didn’t really let this sink in when I first heard about it: Ehsan Iran-Nejad’s pyRevit

I don’t really have the time to figure out all the stuff it does, but one thing that really blew my mind is that you can update the ribbon panel without restarting Revit! I just have to find out how he does this! Especially, since I failed to do this a couple of years back. Maybe the API has changed, maybe there is some wizardry going on, but this is what the RevitPythonShell should have been like.

Adding scripts is as easy as creating a folder structure following a naming convention. I like this idea. I love this idea. Hm… I wonder if we can merge some of these ideas back into RPS?

So… If you haven’t done this yet, go over to pyRevit and give it a spin!

Monday, December 5, 2016

Update to "Embedding a webserver in Autodesk Revit with the RevitPythonShell"

As discussed on the RevitPythonShell forum, previous examples of using ExternalEvent don’t work anymore with Revit 2017.

Turns out, the fix was really easy: You just need to implement the IExternalEventHandler.GetName method. I have placed a comment explaining this very briefly on the page that introduces embedding a webserver in Autodesk Revit with the RevitPythonShell. The source for the updated RpsHttpServer is, of course, on GitHub: rpshttpserver.py

Thanks to Callum for finding the bug and @PMoureu for providing the solution :)

Wednesday, November 16, 2016

How to write in the URL field of a family with the RevitPythonShell

Here is some code showing how to write the URL parameter of a WallType with the RevitPythonShell. This was created as an answer to the RevitPythonShell group forum. This method should work for other families as well!

# find a WallType to work with...
collector = FilteredElementCollector(doc).OfClass(WallType)
wt = [wt for wt in collector 
      if Element.Name.__get__(wt).startswith('_dpv AW1')][0]
print Element.Name.__get__(wt)
parameter = wt.get_Parameter(BuiltInParameter.ALL_MODEL_URL)
transaction = Transaction(doc, 'setting URL')
try: 
    transaction.Start() 
    parameter.Set('http://systems.arch.ethz.ch')
    transaction.Commit()
except: 
    transaction.Rollback()

The tricky part is the line with wt.get_Parameter(BuiltInParameter.ALL_MODEL_URL). I found the ALL_MODEL_URL parameter name using the RevitLookup tool - which can be launched directly from RPS if you have it installed (just type lookup(wt)). The basic steps are:

  1. retrieve the parameter (Element.get_Parameter - you can use the BuiltInParameter enumeration for standard parameters…)
  2. set the value of the parameter (Parameter.Set)
  3. since this changes the BIM model, you need to wrap it all in a Transaction.

Monday, October 24, 2016

Merged PR #42 by @eirannejad to RevitPythonShell

This is exciting: I just merged a pull request on the RevitPythonShell repository. Sure, no big deal, except, it kinda is. Here’s why:

I don’t really have a lot of time to improve the RPS right now as I am mainly working on a totally unrelated project, the CityEnergyAnalyst. And I don’t really BIM much anymore.

Turns out, the RPS has a fan base and they’re stepping up with feature requests, but also improvements in the form of pull requests.

A pull request is a collection of commits that you propose to add to the master branch of the RPS software. You can fork your own version of the RPS and with this feature, request your changes be added back to the main version. This is probably the best way to get changes / bug fixes etc. into the software.

In this case, Ehsan Iran-Nejad stepped up and provided a small patch that adds the folder an external script is defined in to the search paths of the interpreter. This makes it easier to split your code into reusable libraries.

BTW: Check out Ehsan’s awesome project pyRevit which makes working with RPS even easier!

Friday, October 21, 2016

An example in refactoring the CEA

This post is the result of a refactoring effort between Shanshan Hsieh and I for the City Energy Analyst, particularly on the pull request #371.

Compare these two snippets of code:

Original

tHC_corr = [0, 0]
delta_ctrl = [0, 0]

# emission system room temperature control type
if control_system == 'T1':
    delta_ctrl = [2.5, -2.5]
elif control_system == 'T2':
    delta_ctrl = [1.2, -1.2]
elif control_system == 'T3':
    delta_ctrl = [0.9, -0.9]
elif control_system == 'T4':
    delta_ctrl = [1.8, -1.8]

# calculate temperature correction
if heating_system == 'T1':
    tHC_corr[0] = delta_ctrl[0] + 0.15
elif heating_system == 'T2':
    tHC_corr[0] = delta_ctrl[0] - 0.1
elif heating_system == 'T3':
    tHC_corr[0] = delta_ctrl[0] - 1.1
elif heating_system == 'T4':
    tHC_corr[0] = delta_ctrl[0] - 0.9
else:
    tHC_corr[0] = 0

if cooling_system == 'T1':
    tHC_corr[1] = delta_ctrl[1] + 0.5
elif cooling_system == 'T2':  # no emission losses but emissions for ventilation
    tHC_corr[1] = delta_ctrl[1] + 0.7
elif cooling_system == 'T3':
    tHC_corr[1] = delta_ctrl[1] + 0.5
else:
    tHC_corr[1] = 0

return tHC_corr[0], tHC_corr[1]

Refactored

control_delta_heating = {'T1': 2.5, 'T2': 1.2, 'T3': 0.9, 'T4': 1.8}
control_delta_cooling = {'T1': -2.5, 'T2': -1.2, 'T3': -0.9, 'T4': -1.8}
system_delta_heating = {'T0': 0.0, 'T1': 0.15, 'T2': -0.1, 'T3': -1.1, 'T4': -0.9}
system_delta_cooling = {'T0': 0.0, 'T1': 0.5, 'T2': 0.7, 'T3': 0.5}
try:
    result_heating = 0.0 if heating_system == 'T0' else (control_delta_heating[control_system] +
                                                         system_delta_heating[heating_system])
    result_cooling = 0.0 if cooling_system == 'T0' else (control_delta_cooling[control_system] +
                                                         system_delta_cooling[cooling_system])
except KeyError:
    raise ValueError(
        'Invalid system / control combination: %s, %s, %s' % (heating_system, cooling_system, control_system))

return result_heating, result_cooling

Ideally, these two codes produce the same result. I would argue though, that by using a table-based method, that is, keeping the data in lookup tables like dicts, makes the code a bit clearer to understand than using a lot of if...elif...else statements. This simplifies the code down to it’s core message: The result is the sum of the deltas for the control system and the system type.

Another improvement, in my mind, is getting rid of the X[0] and X[1] constructs. In the original code, these were used to group the heating and the cooling values respectively. While in a small snippet like this, that can still be understood, this paradigm breaks down quickly. One way to improve that would be to assign HEATING = 0 and COOLING = 1 and then index like this: tHC_corr[HEATING]. That communicates the intention much better. Using separate dictionaries for heating and cooling values for both emission systems and control systems sidesteps the issue alltogether.

Documentation

@shanshan and I went a step further than just changing the code. Here is a model of what the documentation of the function could look like:

"""
Model of losses in the emission and control system for space heating and cooling.

Correction factor for the heating and cooling setpoints. Extracted from EN 15316-2

(see cea\databases\CH\Systems\emission_systems.xls for valid values for the heating and cooling system values)

T0 means there's no heating/cooling systems installed, therefore, also no control systems for heating/cooling.
In short, when the input system is T0, the output set point correction should be 0.0.
So if there is no cooling systems, the setpoint_correction_for_space_emission_systems function input: (T1, T0, T1) (type_hs, type_cs, type_ctrl),
return should be (2.65, 0.0), the control system is only specified for the heating system.
In another case with no heating systems: input: (T0, T3, T1) return: (0.0, -2.0), the control system is only
specified for the heating system.

PARAMETERS
----------

:param heating_system: The heating system used. Valid values: T0, T1, T2, T3, T4
:type heating_system: str

:param cooling_system: The cooling system used. Valid values: T0, T1, T2, T3
:type cooling_system: str

:param control_system: The control system used. Valid values: T1, T2, T3, T4 - as defined in the
    contributors manual under Databases / Archetypes / Building Properties / Mechanical systems.
    T1 for none, T2 for PI control, T3 for PI control with optimum tuning, and T4 for room temperature control
    (electromagnetically/electronically).
:type control_system: str

RETURNS
-------

:returns: two delta T to correct the set point temperature, dT_heating, dT_cooling
:rtype: tuple(double, double)
"""

Note: The documentation explains what the function is for and also mentions the relevant standards (EN 15316-2) - this could also be references to research papers or whatever. Further, the input values and types are explained and also a link to the documentation for reference. A list of valid inputs is given.

What is missing? Boundary case behaviour - this should actually also be in the documentation! We test this behaviour in the next section:

Unit tests

Check out the file tests/test_sensible_loads.py:

import unittest


class TestCorrectionFactorForHeatingAndCoolingSetpoints(unittest.TestCase):
    def test_calc_t_em_ls_raises_ValueError(self):
        from cea.demand.sensible_loads import setpoint_correction_for_space_emission_systems
        self.assertRaises(ValueError, setpoint_correction_for_space_emission_systems, heating_system='T1',
                          cooling_system='T1', control_system=None)
        self.assertRaises(ValueError, setpoint_correction_for_space_emission_systems, heating_system='T1',
                          cooling_system='XYZ', control_system='T1')
        self.assertRaises(ValueError, setpoint_correction_for_space_emission_systems, heating_system='T1',
                          cooling_system=None, control_system='T1')

    def test_calc_t_em_ls_T0(self):
        from cea.demand.sensible_loads import setpoint_correction_for_space_emission_systems
        self.assertEqual(setpoint_correction_for_space_emission_systems('T1', 'T0', 'T1'), (2.65, 0.0))
        self.assertEqual(setpoint_correction_for_space_emission_systems('T0', 'T3', 'T1'), (0.0, -2.0))

Right now, it contains a single class, TestCorrectionFactorForHeatingAndCoolingSetpoints that inherits from unittest.TestCase. When the Jenkins runs, it will pick up this class, a) because the filename starts with test_ and b) because the classes inherit from TestCase. The Jenkins will then run all the test cases. Each method starting with test_ is run and checked. The self.assert* calls test expected values and actual computations of the setpoint_correction_for_space_emission_systems function. We can see that:

  • calling the method with None or 'XYZ' as one of the parameters should raise an instance of ValueError - this is an edge case that is being tested
  • the setpoint correction for heating or cooling emission systems of type 'T0' (no emission system) should be 0.0

Unit tests like this are a great way to describe how a function should behave, independant of the implementation. It also represents another “mode” of thinking, where you consider edge cases, expected values, failure modes etc. at a very low level. At the level of a “unit” of code.

I believe that especially for code like the CEA, we should use this technique to specify the expected behavior of the system, as we will be on the hook for bugs for the next decade or so. We want to be able to prove the correctnes of our implementation!

Wednesday, June 22, 2016

RevitPythonShell for Revit 2017

I have just released a version of RPS for Revit 2017. It is labeled as a “Pre-Release”, since I have not really had time to test it, but you are all welcome to give it a spin and tell me about any problems you find.

Better yet: Send me pull requests with fixes to your problems!

Tuesday, October 20, 2015

Accessing specific overloads in IronPython (Document.LoadFamily)

The RevitPythonShell makes working with Revit a bit easier, because, you know, Python. The specific flavour of Python used is IronPython - a port of the Python language to the .NET platform. IronPython lets you call into .NET objects seamlessly. In theory. Except when it doesen’t. All abstractions are leaky.
This article is all about a specific leak, based on an impedance mismatch between the object model used in .NET and that used in Python: In C#, you can overload a method. A simple way to think about this is to realize that the name of the method includes its signature, the list of parameter (types) it takes. Go read a book if you want the gory details. Any book. I’m just going to get down to earth here and talk about a specific example:
The Document.LoadFamily method.
The standard method for selecting a specific overload is just calling the function and having IronPython figure it out.
I guess the place to read up on how to call overloaded methods is here: http://ironpython.net/documentation/dotnet/dotnet.html#method-overloads. To quote:
When IronPython code calls an overloaded method, IronPython tries to select one of the overloads at runtime based on the number and type of arguments passed to the method, and also names of any keyword arguments.
This works really well if the types passed in match the signatures of a specific method overload well. IronPython will try to automatically convert types, but will fail with a TypeError if more than one method overload matches.
The Document.LoadFamily method is special in that one of its parameters is marked as out in .NET - according to the standard IronPython documentation (REF) that should translate into a tuple of return values - and it does, if you know how. It is just non-intuitive - see this question on Stack Overflow:
revitpythonshell provides two very similar methods to load a family.
LoadFamily(self: Document, filename:str) -> (bool, Family)
LoadFamily(self: Document, filename:str) -> bool
So it seems like only the return values are different. I have tried to calling it in several different ways:
(success, newFamily) = doc.LoadFamily(path)
success, newFamily = doc.LoadFamily(path)
o = doc.LoadFamily(path)
But I always just get a bool back. I want the Family too.
What is happening here is that the c# definitions of the method are:
public bool LoadFamily(
    string filename
)
and
public bool LoadFamily(
    string filename,
    out Family family
)
The IronPython syntax candy for out parameters, returning a tuple of results, can’t automatically be selected here, because calling LoadFamily with just a string argument matches the first method overload.
You can get at the overload you are looking for like this:
import clr
family = clr.Reference[Family]()
# family is now an Object reference (not set to an instance of an object!)
success = doc.LoadFamily(path, family)  # explicitly choose the overload
# family is now a Revit Family object and can be used as you wish
This works by creating an object reference to pass into the function and the method overload resultion thingy now knows which one to look for.
Working under the assumption that the list of overloads shown in the RPS help is the same order as they appear, you can also do this:
success, family = doc.LoadFamily.Overloads.Functions[0](path)
and that will, indeed, return a tuple (bool, Autodesk.Revit.DB.Family). I just don’t think you should be doing it that way, as it introduces a dependency on the order of the method overloads - I wouldn’t want that smell in my code…
Note, that this has to happen inside a transaction, so a complete example might be:
import clr
t = Transaction(doc, 'loadfamily')
t.Start()
try:
    family = clr.Reference[Family]()
    success = doc.LoadFamily(path, family)
    # do stuff with the family
    t.Commit()
except:
    t.Rollback()

Tuesday, July 7, 2015

The __file__ variable in RevitPythonShell

Today I’m going to talk about a special builtin variable __file__ as it is implemented in the RevitPythonShell. This feature is only available to external scripts
and RpsAddins. This is similar to how __file__ is normally defined for Python: It is not defined in the REPL.

Simply put: __file__ contains the path to the current file being run.

With external scripts, this is a path to a python script. With RpsAddins, it is the path to the addin’s DLL, a path separator, and the name of the script (e.g. C:\Program Files (x86)\MyAddin\MyAddin.dll\helloworld.py).

Suppose you have deployed some scripts to another computer. Suppose those scripts rely on other files - a database, maybe, or icons, pictures, anything really. If you keep referencing these files as C:\Users\Gareth\AwesomeScripts\all_my_data.sqlite you are going to run into difficulties on a computer that doesn’t belong to Gareth. Meg’s computer won’t know how to find the database! And she is going to complain to Meg and meg is going to complain to her boss and her boss is going to complain to your boss and your boss is going to go get coffee, lock himself up in his office and brood for a very long time. Then, he’s going to send someone to tell you to come to his office ASAP. Now!

You don’t want that to happen! That is why you’re going to make sure that all file references are relative to the installation of your external scripts / RpsAddins. And unless you have a priori knowledge of the folder name you’re installing to, well, I’ve got your back:

def get_folder():
    import os
    # assume external script
    folder = os.path.dirname(__file__)
    if folder.lower().endswith('.dll'):
        # nope - RpsAddin
        folder = os.path.dirname(folder)
    return folder

Tuesday, June 30, 2015

Embedding a webserver in Autodesk Revit with the RevitPythonShell

This is a more elaborate example that shows how to embedd a webserver in Autodesk Revit and use it to automate tasks.

How do you access the BIM from outside Revit? With the Revit API it is easy to access the outside world from within Revit. Sometimes you want to write software that needs to read a schedule from a .rvt document - from outside of Revit.

As an example, say you have a shell script that reads in schedule data from a Revit document and saves it to a CSV file.

One way to solve this is to have Revit act as a web server, say, http://localhost:8080. You could then use curl:

curl http://localhost:8080/schedules/my_schedule_name > my_local_file_name.csv

Let us build a RevitPythonShell script that allows you to do just that: Export any schedule in the BIM as a CSV file through a web service. Depending on the URL requested, you could return a screenshot of the current view or ways to open / close documents:

curl http://localhost:8080/screenshot
curl http://localhost:8080/open/Desktop/Project1.rvt

This is a variation on the non-modal dialog issue (see here too!). We want to run a web server in a separate thread, but have handling requests run in the main Revit thread so that we have access to the API. We will be using an external event to solve this.

The web server itself uses the HttpListenerclass, which runs in a separate thread and just waits for new connections. These are then handled by pushing them into a queue and notifying the ExternalEvent that a new event has happened.

This is where the script starts:

def main():
    contexts = ContextQueue()
    eventHandler = RpsEventHandler(contexts)
    externalEvent = ExternalEvent.Create(eventHandler)
    server = RpsServer(externalEvent, contexts)
    serverThread = Thread(ThreadStart(server.serve_forever))
    serverThread.Start()

Whoa! What is going on here?

  • a communication channel contexts is created for sending web requests (stashed as HttpListenerContext instances) to the ExternalEvent thread.
  • an IExternalEventHandler implementation called RpsEventHandler that handles producing the output.
  • a web server wrapped in a method serve_forever that listens for web requests with the HttpListener, stores them into the context queue and notifies the external event that there is work to be done.

We’ll look into each component one by one below. Note: The full code can be found here in the rps-sample-scripts GitHub repository.

Let’s start with the ContextQueue:

class ContextQueue(object):
    def __init__(self):
        from System.Collections.Concurrent import ConcurrentQueue
        self.contexts = ConcurrentQueue[HttpListenerContext]()

    def __len__(self):
        return len(self.contexts)

    def append(self, c):
        self.contexts.Enqueue(c)

    def pop(self):
        success, context = self.contexts.TryDequeue()
        if success:
            return context
        else:
            raise Exception("can't pop an empty ContextQueue!")

This is nothing speciall - just a thin wrapper arround ConcurrentQueue from the .NET library. The RpsServer will append to the context while the RpsEventHandler pops the context.

A more interesting class to look at is probably RpsEventHandler:

class RpsEventHandler(IExternalEventHandler):
    def __init__(self, contexts):
        self.contexts = contexts
        self.handlers = {
            'schedules': get_schedules
            # add other handlers here
        }

    def Execute(self, uiApplication):
        while self.contexts:
            context = self.contexts.pop()
            request = context.Request
            parts = request.RawUrl.split('/')[1:]
            handler = parts[0]  # FIXME: add error checking here!
            args = parts[1:]
            try:
                rc, ct, data = self.handlers[handler](args, uiApplication)
            except:
                traceback.print_exc()
                rc = 404
                ct = 'text/plain'
                data = 'unknown error'
            response = context.Response
            response.ContentType = ct
            response.StatusCode = rc
            buffer = Encoding.UTF8.GetBytes(data)
            response.ContentLength64 = buffer.Length
            output = response.OutputStream
            output.Write(buffer, 0, buffer.Length)
            output.Close()

    def GetName(self):
        return 'RpsHttpServer'

The Execute method here does the grunt work of working with the .NET libraries and delegating requests to the specific handlers. You can extend this class can by adding new handlers to it. In fact, you don’t even need to extend the class to add handlers - just register them in the handlers dictionary.

Each handler takes a list of path elements and a UIApplication object. The handler runs in the Revit API context. It should return an HTTP error code, a content type and a string containing the response.

An example of such a handler is get_schedules:

def get_schedules(args, uiApplication):
    '''add code to get a specific schedule by name here'''
    print 'inside get_schedules...'
    from Autodesk.Revit.DB import ViewSchedule
    from Autodesk.Revit.DB import FilteredElementCollector
    from Autodesk.Revit.DB import ViewScheduleExportOptions
    import tempfile, os, urllib

    doc = uiApplication.ActiveUIDocument.Document
    collector = FilteredElementCollector(doc).OfClass(ViewSchedule)
    schedules = {vs.Name: vs for vs in list(collector)}

    if len(args):
        # export a single schedule
        schedule_name = urllib.unquote(args[0])
        if not schedule_name.lower().endswith('.csv'):
            # attach a `.csv` to URL for browsers
            return 302, None, schedule_name + '.csv'
        schedule_name = schedule_name[:-4]
        if not schedule_name in schedules.keys():
            return 404, 'text/plain', 'Schedule not found: %s' % schedule_name
        schedule = schedules[schedule_name]
        fd, fpath = tempfile.mkstemp(suffix='.csv')
        os.close(fd)
        dname, fname = os.path.split(fpath)
        opt = ViewScheduleExportOptions()
        opt.FieldDelimiter = ', '
        schedule.Export(dname, fname, opt)
        with open(fpath, 'r') as csv:
            result = csv.read()
        os.unlink(fpath)
        return 200, 'text/csv', result
    else:
        # return a list of valid schedule names
        return 200, 'text/plain', '\n'.join(schedules.keys())

When you write your own handler functions, make sure to implement the function signature: rc, ct, data my_handler_function(args, uiApplication).

In get_schedules, a FilteredElementCollector is used to find all ViewSchedule instances in the currently active document. Using a dict comprehension is a nifty way to quickly make a lookup table for checking the arguments.

The args parameter contains the components of the url after the first part, which is used to select the handler function. So if the requested URL were, say, http://localhost:8080/schedules, then args would be an empty list. In this case, we just return a list of valid schedule names, one per line - see the else at the bottom of the function.

If the URL were, say http://localhost:8080/schedules/My%20Schedule%20Name, then the args list would contain a single element, "My%20Schedule%20Name". The %20 encoding is a standard for URLs and is used to encode a space character. We use urllib to unquote the name.

In order to make the function work nicely with a browser, it is nice to have a .csv ending to it - we redirect to the same URL with a .csv tacked on if it is missing! The code for handling the redirect can be found in the full sample script on GitHub. Notice how the HTTP return code 302 is used as the return value for rc - you can look up all the HTTP return codes online, we will only be using 200 (OK), 302 (Found - used for redirects) and 404 (Not Found).

Next, the script checks to make sure the schedule name is a valid schedule in the document. A 404 return code is used to indicate an error here.

The actual code for returning a schedule makes use of a technique described in Jeremy Tammik’s blog post The Schedule API and Access to Schedule Data. The ViewSchedule.Export method is used to write the schedule to a temporary file in CSV format and then read back into memory before deleting the file on disk. This is a bit of a hack and coming up with a better solution is left as an exercise for the reader…

The final piece in our puzzle is the RpsServer:

class RpsServer(object):
    def __init__(self, externalEvent, contexts, port=8080):
        self.port = port
        self.externalEvent = externalEvent
        self.contexts = contexts

    def serve_forever(self):
        try:
            self.running = True
            self.listener = HttpListener()
            prefix = 'http://localhost:%i/' % self.port
            self.listener.Prefixes.Add(prefix)
            try:
                print 'starting listener', prefix
                self.listener.Start()
                print 'started listener'
            except HttpListenerException as ex:
                print 'HttpListenerException:', ex
                return
            waiting = False
            while self.running:
                if not waiting:
                    context = self.listener.BeginGetContext(
                        AsyncCallback(self.handleRequest),
                        self.listener)
                waiting = not context.AsyncWaitHandle.WaitOne(100)
        except:
            traceback.print_exc()

    def stop(self):
        print 'stop()'
        self.running = False
        self.listener.Stop()
        self.listener.Close()

    def handleRequest(self, result):
        '''
        pass the request to the RevitEventHandler
        '''
        try:
            listener = result.AsyncState
            if not listener.IsListening:
                return
            try:
                context = listener.EndGetContext(result)
            except:
                # Catch the exception when the thread has been aborted
                self.stop()
                return
            self.contexts.append(context)
            self.externalEvent.Raise()
            print 'raised external event'
        except:
            traceback.print_exc()

This class implements the serve_forever function that starts an HttpListener on a specified port and uses handleRequest to pass any requests on to the external event for processing inside the Revit API context.

Check the rpshttpserver.py example on GitHub.

Monday, June 1, 2015

Using esoreader to parse EnergyPlus eso files

A short while ago I posted a short tutorial on the esoreader module. This post is an update, showing off the new pandas interface that makes life so much easier when exploring EnergyPlus output files.

The building simulation engine EnergyPlus stores its main output in a file with the ending ‘.eso’. This format makes it easy to log variable values during simulation, but is hard to use for post-processing. EnergyPlus offers a sqlite version of this data, but using it requires understanding the eso file format itself. EnergyPlus also can output a csv file, but that is limited in the number of columns.

The esoreader module makes it very easy to explore the output of EnergyPlus, say, in an IPython notebook interactive environment.

I wrote this module as part of my work at the chair for Architecture and Building Systems (A/S) at the Institute of Technology in Architecture, ETH Zürich, Switzerland.

In [1]: import esoreader

In [2]: eso = esoreader.read_from_path(r"C:\...\experiment01.eso")

In [3]: eso.find_variable('heating')
Out[3]:
[('TimeStep', None, 'Heating:EnergyTransfer'),
 ('TimeStep',
  'DEFAULT_ZONEZONEHVAC:IDEALLOADSAIRSYSTEM',
  'Zone Ideal Loads Zone Total Heating Energy')]

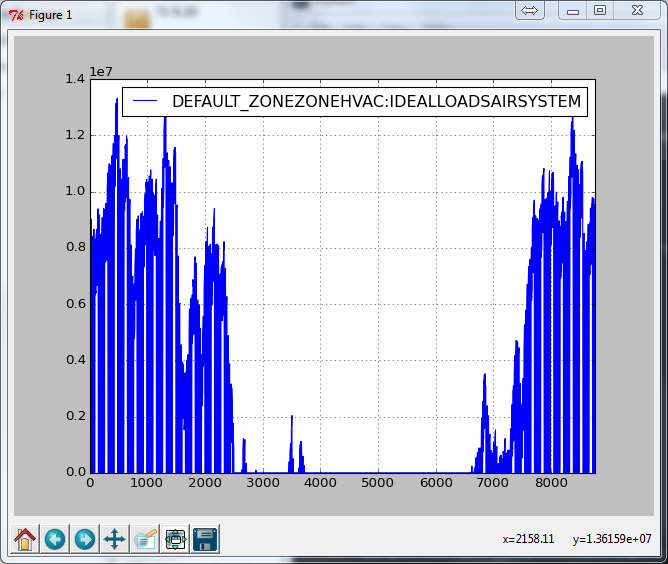
In [4]: df = eso.to_frame('heating energy')

In [5]: df[:10]
Out[5]:
   DEFAULT_ZONEZONEHVAC:IDEALLOADSAIRSYSTEM
0                            8596050.719384
1                            8672511.667988
2                            8737544.119096
3                            8799182.506582
4                            8862116.803218
5                            8928593.537248
6                            5296266.226576
7                                  0.000000
8                                  0.000002
9                                  0.000000

In [6]: df.plot()
Out[6]: <matplotlib.axes._subplots.AxesSubplot at 0x7854090>

In [7]: %matplotlib tk

In [8]: df.plot()
Out[8]: <matplotlib.axes._subplots.AxesSubplot at 0x7b66670>

Zone Ideal Loads Zone Total Heating Energy

Notice in the above example how the variable is matched by substring - you don’t have to specify the whole variable name. Each matching variable will show up in the resulting DataFrame with the key used as the column name - in this case ‘DEFAULT_ZONEZONEHVAC:IDEALLOADSAIRSYSTEM’.

Also, as this is an IPython session, I used the magic variable incantation %matplotlib tk to switch on the GUI loop that allowes plotting. You can choose another backend if you like, but I am pretty sure that tk should be available with your Python distribution.

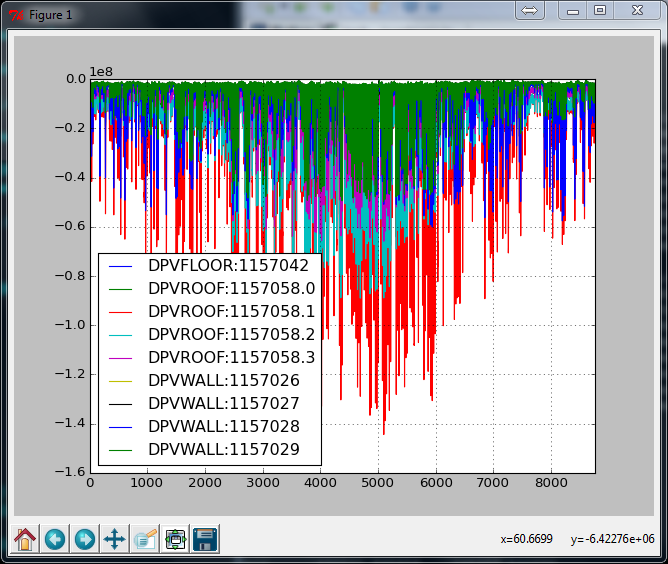
An example with multiple columns:

In [1]: eso.find_variable('net thermal radiation heat gain energy')
Out[1]:
[('TimeStep',
  'DPVROOF:1157058.3',
  'Surface Outside Face Net Thermal Radiation Heat Gain Energy'),
 ('TimeStep',
  'DPVWALL:1157028',
  'Surface Outside Face Net Thermal Radiation Heat Gain Energy'),
 ('TimeStep',
  'DPVWALL:1157027',
  'Surface Outside Face Net Thermal Radiation Heat Gain Energy'),
 ('TimeStep',
  'DPVROOF:1157058.2',
  'Surface Outside Face Net Thermal Radiation Heat Gain Energy'),
 ('TimeStep',
  'DPVFLOOR:1157042',
  'Surface Outside Face Net Thermal Radiation Heat Gain Energy'),
 ('TimeStep',
  'DPVWALL:1157029',
  'Surface Outside Face Net Thermal Radiation Heat Gain Energy'),
 ('TimeStep',
  'DPVROOF:1157058.1',
  'Surface Outside Face Net Thermal Radiation Heat Gain Energy'),
 ('TimeStep',
  'DPVROOF:1157058.0',
  'Surface Outside Face Net Thermal Radiation Heat Gain Energy'),
 ('TimeStep',
  'DPVWALL:1157026',
  'Surface Outside Face Net Thermal Radiation Heat Gain Energy')]

In [2]: df = eso.to_frame('net thermal radiation heat gain energy')

In [3]: df.plot()
Out[3]: <matplotlib.axes._subplots.AxesSubplot at 0xbd11150>

Net Thermal Radiation Heat Gain Energy

The key parameter to to_frame

You can use the key parameter to select a single column:

In [1]: df = eso.to_frame('net thermal radiation', key='DPVROOF:1157058.3')

In [2]: df[:10]
Out[2]:
   DPVROOF:1157058.3
0    -8985934.016604
1    -8453530.628023
2    -7611418.498363
3    -6936246.291753
4    -6206109.857522
5    -5879653.262523
6    -5676601.453020
7    -5606988.050900
8    -5844912.195173
9    -4712551.701917

The index parameter to to_frame

You can use the index parameter to specify an index for the DataFrame. Since this is time-series data, a common pattern could be:

In [1]: hours_in_year = pd.date_range('2013-01-01', '2013-12-31 T23:00', freq='H')

In [2]: df = eso.to_frame('heating energy', index=hours_in_year)

In [3]: df[:10]
Out[4]:
                     DEFAULT_ZONEZONEHVAC:IDEALLOADSAIRSYSTEM
2013-01-01 00:00:00                            8596050.719384
2013-01-01 01:00:00                            8672511.667988
2013-01-01 02:00:00                            8737544.119096
2013-01-01 03:00:00                            8799182.506582
2013-01-01 04:00:00                            8862116.803218
2013-01-01 05:00:00                            8928593.537248
2013-01-01 06:00:00                            5296266.226576
2013-01-01 07:00:00                                  0.000000
2013-01-01 08:00:00                                  0.000002
2013-01-01 09:00:00                                  0.000000

Tuesday, May 19, 2015

RevitLookup and RevitPythonShell

RevitLookup and RevitPythonShell

RevitLookup is a handy tool for interactively exploring Revit BIM databases. If you want to get anywhere with Revit API programming, you should look into RevitLookup. You should also be reading the RevitLookup’s author Jeremy Tammik’s blog The Building Coder!

The standard RevitPythonShell InitScript contains a section dedicated to RevitLookup:

#------------------------------------------------------------------------------
import clr
from Autodesk.Revit.DB import ElementSet, ElementId

class RevitLookup(object):
    def __init__(self, uiApplication):
        '''
        for RevitSnoop to function properly, it needs to be instantiated
        with a reference to the Revit Application object.
        '''
        # find the RevitLookup plugin
        try:
            rlapp = [app for app in uiApplication.LoadedApplications
                     if app.GetType().Namespace == 'RevitLookup'
                     and app.GetType().Name == 'App'][0]
        except IndexError:
            self.RevitLookup = None
            return
        # tell IronPython about the assembly of the RevitLookup plugin
        clr.AddReference(rlapp.GetType().Assembly)
        import RevitLookup
        self.RevitLookup = RevitLookup
        # See note in CollectorExt.cs in the RevitLookup source:
        self.RevitLookup.Snoop.CollectorExts.CollectorExt.m_app = uiApplication
        self.revit = uiApplication

    def lookup(self, element):
        if not self.RevitLookup:
            print 'RevitLookup not installed. Visit https://github.com/jeremytammik/RevitLookup to install.'
            return
        if isinstance(element, int):
            element = self.revit.ActiveUIDocument.Document.GetElement(ElementId(element))
        if isinstance(element, ElementId):
            element = self.revit.ActiveUIDocument.Document.GetElement(element)
        if isinstance(element, list):
            elementSet = ElementSet()
            for e in element:
                elementSet.Insert(e)
            element = elementSet
        form = self.RevitLookup.Snoop.Forms.Objects(element)
        form.ShowDialog()
_revitlookup = RevitLookup(__revit__)
def lookup(element):
    _revitlookup.lookup(element)

#------------------------------------------------------------------------------

What this does is define a global function lookup that will open up the “Snoop Objects” dialog from RevitLookup with the element passed. In fact, you can pass ElementIds, lists of Element objects or just plain integers, that are converted to ElementIds - obtain these from the Manage->IDs of Selection command in the Ribbon. Since the Document also derives from Element, you can inspect it too!

Here are some fun things to try, assuming you haven’t removed anything from the standard InitScript:

Select an element in the BIM, start an interactive Python shell and type:

>>> lookup(selection[0])

You should see something like this:

lookup(selection[0])

If you don’t have RevitLookup installed, you will instead get a message like this:

lookup(selection[0]) - not installed

Typing

>>> lookup(1157058) # make sure this is a valid ElementId!

will result in something like this:

lookup(selection[0]) - not installed

Friday, March 20, 2015

The RevitPythonShell moved to GitHub

The RevitPythonShell has moved to GitHub! You can find the project here: https://github.com/architecture-building-systems/revitpythonshell

Google Code is shutting down so I moved the code to GitHub. I’m currently working on fixing / creating the wiki pages, but you should be able to download the latest release already.

Thursday, March 19, 2015

More control over the RibbonPanel in RevitPythonShell

This post explains how to exert more control over the items shown in the RibbonPanel by your RevitPythonShell scripts.

The default behaviour of RevitPythonShell for external scripts is to group them into split buttons and place the remaining scripts in stacks of up to three. External scripts that are assigned the same “Group” value are placed together in a split button - in the example below, the external scripts “Button five”, “Button six” and “Button seven” are all assigned the group value “Group 5-7”.

Configuring external scripts

After saving your changes, you need to restart Revit to see any changes. The Ribbon will then include this panel:

External scripts in Ribbon panel

This is fine for collecting your personal scripts and while developing new scripts. When it comes to publishing a plugin (even inside your organization) you might want more control of how the buttons appear.

NOTE: When you create a RpsAddin for deployment, you use a slightly different approach by specifying the buttons in the RpsAddin xml file. But you are still limited to PushButtons.

The Revit API contains a selection of controls you can use to execute scripts that you can use instead. You can find out all about these in the Revit API Developers Guide (Ribbon Panels and Controls).

The Revit API expects you to build your Ribbon panels and controls while the application is starting up - during the IExternalApplication.OnStartup method of a plugin. After that, the access to the UIControlledApplication which is needed to alter the Ribbon is not available anymore. Therefore, you can only access the UIControlledApplication object in the RPS startup script - through a special variable called __uiControlledApplication__. The startup script in RPS gives you access to the very variable it uses to configure its own user interface. All we need to do now is hook up an RPS script with a button on the ribbon. Let us assume a very simple script:

"""
helloworld.py - prints a greeting
"""
print 'hello, world!'

(you can find this script in the rps-sample-scripts project on GitHub)

This script shall be called whenever the user clicks a button or other control on our custom Ribbon panel.

There is just one problem here. When you create a control on a Revit Ribbon panel, you need to pass in the path to a DLL and the fully qualified name (including namespaces) of a class inside that DLL that implements IExternalCommand. That does not sound like a python script at all!

To support this, the RevitPythonShell exposes a special class called ExternalCommandAssemblyBuilder which can create such a DLL. To use it, you just pass in a dictionary of class names and the corresponding python script files. The DLL created is just a very thin wrapper that calls into the RpsRuntime.dll (yes, that means you can use this for your RpsAddins!) with the script path and gets them executed.

So, a simple startup script that creates a Ribbon panel with a single PushButton would look like this:

'''
simple_ribbon.py - creates a ribbon panel with a single push button.

NOTE:
    - this MUST be set as a startup script for it to work
    - the RPS variable "EXAMPLES_PATH" must be set and contain "helloworld.py"
'''

# script that is run when Revit starts in the IExternalApplication.Startup event.
try:
    import os
    from RevitPythonShell.RpsRuntime import ExternalCommandAssemblyBuilder
    from Autodesk.Revit.UI import *

    SCRIPT_PATH = os.path.join(__vars__['EXAMPLES_PATH'], "helloworld.py")
    DLL_PATH = os.path.expandvars(r"%APPDATA%\RevitPythonShell2015\simple_ribbon.dll")
    print 'storing external command assembly here:', DLL_PATH

    builder = ExternalCommandAssemblyBuilder()
    builder.BuildExternalCommandAssembly(
        DLL_PATH,
        {'HelloWorld': SCRIPT_PATH})

    panel = __uiControlledApplication__.CreateRibbonPanel('simple_ribbon')

    pbd = PushButtonData('pb_HelloWorld', 'hello, world!', DLL_PATH, 'HelloWorld')
    panel.AddItem(pbd)

    #__window__.Close()  # closes the window
except:
    import traceback       # note: add a python27 library to your search path first!
    traceback.print_exc()  # helps you debug when things go wrong

(NOTE: you can find this script in the rps-sample-scripts repository on GitHub)

The script (and all following scripts in this post) assumes you have the directory structure of the rps-sample-scripts repository downloaded to your machine - a simple git clone should do the trick - and have set the RPS variable EXAMPLES_PATH to point to that folder. You could also just edit the script text to hard code the paths and live with the nasty code smell…

Adding simple_ribbon.py as your startup script will result in a new ribbon panel added to RPS:

simple_ribbon.py output

When clicked, you will be greeted as expected.

There are a few things going on here, so let’s go through them one by one. First, the whole body of the script is wrapped in a try/except. This is important, since a crash in the script might bring down the whole of Revit and you will not know where it happened - so we use traceback.print_exc() to print an exception trace. This is a handy debugging tip for your RPS scripting skill set!

Next, we create an assembly for Revit to load when you click the push button. The arguments to builder.BuildExternalCommandAssembly include the path of the assembly to be created. I chose to place it in the same folder as the CommandLoaderAssembly.dll - which is a similar dll created by RPS for the external scripts defined in the Configure dialog. You can place it anywhere the script has write access to.

Adding a panel to the ribbon and adding a push button to the panel is basically just an exercise of translating the sample c# code from the SDK into python. Adding images is also possible. Consider the following revised version:

% simple_ribbon_with_icons.py (includes images)

This produces a Ribbon panel that looks like this:

simple ribbon with icon

As far as I can tell, you only really need to set the LargeImage property of the PushButtonData object - the Image property seems to be an atavism from an ancient version of Revit…

The rps-sample-scripts repository on GitHub contains a translation of the New Ribbon Panel example from the Revit API Developer’s Guide:

"""
new_ribbon_panel.py - a startup script to create a selection of
controls on the ribbon.

This script is based on the New Ribbon Panel and Controls example in the
Revit API Devolopers Guide.

NOTE:
    - this MUST be set as a startup script for it to work
    - the RPS variable "EXAMPLES_PATH" must be set and contain "helloworld.py"
"""

import os
import clr
clr.AddReference('PresentationCore')
from System.Windows.Media.Imaging import BitmapImage
from System import Uri
from RevitPythonShell.RpsRuntime import ExternalCommandAssemblyBuilder
from Autodesk.Revit.UI import *

SCRIPT_PATH = os.path.join(__vars__['EXAMPLES_PATH'], "helloworld.py")
LARGE_IMG_PATH = os.path.join(__vars__['EXAMPLES_PATH'], "PythonScript32x32.png")
SMALL_IMG_PATH = os.path.join(__vars__['EXAMPLES_PATH'], "PythonScript16x16.png")
EXAMPLES_PATH = __vars__['EXAMPLES_PATH']
DLL_PATH = os.path.expandvars(r"%APPDATA%\RevitPythonShell2015\simple_ribbon.dll")
print 'storing external command assembly here:', DLL_PATH


def create_ribbon_panel():
    panel = __uiControlledApplication__.CreateRibbonPanel("New Ribbon Panel")
    add_radio_group(panel)
    panel.AddSeparator()
    add_push_button(panel)
    panel.AddSeparator()
    add_split_button(panel)
    panel.AddSeparator()
    add_stacked_buttons(panel)
    panel.AddSeparator()
    add_slide_out(panel)


def add_radio_group(panel):
    """add radio button group"""
    radio_data = RadioButtonGroupData("radioGroup")
    radio_button_group = panel.AddItem(radio_data)

    tb1 = ToggleButtonData("toggleButton1", "Red")
    tb1.ToolTip = "Red Option"
    tb1.LargeImage = BitmapImage(Uri(os.path.join(
        EXAMPLES_PATH, 'StartupScripts', 'red.png')))

    tb2 = ToggleButtonData("toggleButton2", "Green")
    tb2.ToolTip = "Green Option"
    tb2.LargeImage = BitmapImage(Uri(os.path.join(
        EXAMPLES_PATH, 'StartupScripts', 'green.png')))

    tb3 = ToggleButtonData("toggleButton3", "Blue")
    tb3.ToolTip = "Blue Option"
    tb3.LargeImage = BitmapImage(Uri(os.path.join(
        EXAMPLES_PATH, 'StartupScripts', 'blue.png')))

    radio_button_group.AddItem(tb1)
    radio_button_group.AddItem(tb2)
    radio_button_group.AddItem(tb3)


def add_push_button(panel):
    """add push button"""
    push_button = panel.AddItem(
        PushButtonData("pb_HelloWorld", "Hello, world!",
                       DLL_PATH, "HelloWorld"))
    push_button.ToolTip = "Say hello world"
    context_help = ContextualHelp(ContextualHelpType.Url, "http://www.autodesk.com")
    push_button.SetContextualHelp(context_help)

    push_button.LargeImage = BitmapImage(Uri(LARGE_IMG_PATH))


def add_split_button(panel):
    """add a split button"""
    button_one = PushButtonData("pbButtonOne", "Option one",
                                DLL_PATH, "HelloWorld")
    button_one.LargeImage = BitmapImage(Uri(os.path.join(
        EXAMPLES_PATH, 'StartupScripts', 'one.png')))

    button_two = PushButtonData("pbButtonTwo", "Option two",
                                DLL_PATH, "HelloWorld")
    button_two.LargeImage = BitmapImage(Uri(os.path.join(
        EXAMPLES_PATH, 'StartupScripts', 'two.png')))

    button_three = PushButtonData("pbButtonThree", "Option three",
                                DLL_PATH, "HelloWorld")
    button_three.LargeImage = BitmapImage(Uri(os.path.join(
        EXAMPLES_PATH, 'StartupScripts', 'three.png')))

    split_button = panel.AddItem(SplitButtonData("splitButton", "Split"))
    split_button.AddPushButton(button_one)
    split_button.AddPushButton(button_two)
    split_button.AddPushButton(button_three)


def add_stacked_buttons(panel):
    """Add a text box and combo box as stacked items"""
    combo_box_data = ComboBoxData("comboBox")
    text_data = TextBoxData("Text Box")
    text_data.Image = BitmapImage(Uri(SMALL_IMG_PATH))
    text_data.Name = "Text Box"
    text_data.ToolTip = "Enter some text here"
    text_data.LongDescription = """This is text that will appear next to the image
        when the user hovers the mouse over the control"""
    text_data.ToolTipImage = BitmapImage(Uri(LARGE_IMG_PATH))

    stacked_items = panel.AddStackedItems(text_data, combo_box_data)

    text_box = stacked_items[0]
    text_box.PromptText = "Enter a comment"
    text_box.ShowImageAsButton = True
    text_box.ToolTip = "Enter some text"
    text_box.EnterPressed += lambda sender, args: TaskDialog.Show('new_ribbon_panel', sender.Value)

    combo_box = stacked_items[1]
    combo_box.ItemText = "ComboBox"
    combo_box.ToolTip = "Select an Option"
    combo_box.LongDescription = "Select a number or letter"

    member_data_a = ComboBoxMemberData('A', 'Option A')
    member_data_a.Image = BitmapImage(Uri(os.path.join(
        EXAMPLES_PATH, 'StartupScripts', 'a.png')))
    member_data_a.GroupName = 'Letters'
    combo_box.AddItem(member_data_a)

    member_data_b = ComboBoxMemberData('B', 'Option B')
    member_data_b.Image = BitmapImage(Uri(os.path.join(
        EXAMPLES_PATH, 'StartupScripts', 'b.png')))
    member_data_b.GroupName = 'Letters'
    combo_box.AddItem(member_data_b)

    member_data_c = ComboBoxMemberData('C', 'Option C')
    member_data_c.Image = BitmapImage(Uri(os.path.join(
        EXAMPLES_PATH, 'StartupScripts', 'c.png')))
    member_data_c.GroupName = 'Letters'
    combo_box.AddItem(member_data_c)

    member_data_1 = ComboBoxMemberData('1', 'Option 1')
    member_data_1.Image = BitmapImage(Uri(os.path.join(
        EXAMPLES_PATH, 'StartupScripts', 'one_small.png')))
    member_data_1.GroupName = 'Numbers'
    combo_box.AddItem(member_data_1)

    member_data_2 = ComboBoxMemberData('2', 'Option 2')
    member_data_2.Image = BitmapImage(Uri(os.path.join(
        EXAMPLES_PATH, 'StartupScripts', 'two_small.png')))
    member_data_2.GroupName = 'Numbers'
    combo_box.AddItem(member_data_2)

    member_data_3 = ComboBoxMemberData('3', 'Option 3')
    member_data_3.Image = BitmapImage(Uri(os.path.join(
        EXAMPLES_PATH, 'StartupScripts', 'three_small.png')))
    member_data_3.GroupName = 'Numbers'
    combo_box.AddItem(member_data_3)

def add_slide_out(panel):
    pass  # left as exercise for the reader :)


if __name__ == '__main__':
    try:
        builder = ExternalCommandAssemblyBuilder()
        builder.BuildExternalCommandAssembly(
            DLL_PATH,
            {'HelloWorld': SCRIPT_PATH})
        create_ribbon_panel()
    except:
        import traceback
        traceback.print_exc()

If you are really interested on what is produced by the ExternalCommandAssemblyBuilder, just use JetBrains dotPeek to decompile the simple_ribbon.dll. When I tried, I ended up with this:

Disassembled source code of simple_ribbon.py

I’ll leave it as an exercise to the reader to get on GitHub and check out the source for RpsExternalCommandScriptBase - it has a constructor that saves the script path as a member to be called when Revit decides to Execute it.

Friday, February 6, 2015

Batteries included!

The newest versions of the RevitPythonShell include a copy of the python standard library. This copy is taken from IronPython. This means you don’t need to add a search path to a local python distribution when importing standard python modules.

Since the library is included in a zip file embedded in the RpsRuntime.dll, it is also automatically deployed with when creating RpsAddIns.

The versions supporting this feature are:

  • (r223) Installer for Autodesk Revit 2015 (experimental)
  • Installer for Autodesk Vasari (Beta 3)
  • List item

Thursday, January 15, 2015

Introducing the non-modal shell in RevitPythonShell (r223)

You have no idea how excited I am about this release! Revision r223 of the RevitPythonShell has been tested by a select few very brave people (Ehsan Iran Nejad and Callum Freeman) and seems to work. Normally I’m not so worried about pushing out new versions, but this one is… different.
The idea actually came from Ehsan. The Next Big Thing. Also known as the non-modal shell.
I know, I know - I need to get a lot better at coming up with good names for the various parts in RevitPythonShell, but for now, that is what it is called: Non-modal shell.
The non-modal shell is different from the standard RevitPythonShell shell in that it is… well… non-modal. What does that mean? Currently, when you start a shell in RPS, the shell gets the focus and you can’t interact with the rest of the Revit GUI until you close the shell again. This is cool for working with short scripts, trying stuff out etc, but we can do better:
The non-modal shell does not block the rest of Revit. You can select stuff in the view, make changes to the BIM etc. And then query the selection in the shell or do whatever you like.
With some exceptions.
You see, because the shell is non-modal, it is not running in the special thread Revit needs you to be in for accessing the API. You would get a lot of ugly errors, if there wasn’t some clever magic going on in the background that sends all input to the interactive shell to an implementation of IExternalEventHandler which Revit then runs in the correct thread and everything is fine and dandy.
What doesn’t work though, is using transactions in the interactive shell:
>>> t = Transaction(doc, 'test')
>>> t.Start()
Autodesk.Revit.DB.TransactionStatus.Started
>>> t.GetStatus()
Autodesk.Revit.DB.TransactionStatus.RolledBack
>>> t.Commit()
Traceback (most recent call last):
  File "<stdin>", line 1, in <module>
Exception: The transaction has not been started yet (the current status is not 'Started'). A transaction must be started before it can be either committed or rolled back.
>>>
You can get around this by using the IronPython Pad - the little editor below the interactive shell. This allows you to run multiple lines at a time and those will be run in the same IExternalEventHandler so the problem does not show up.
You can find the installer for this (experimental) version of RevitPythonShell in the Downloads section of the project homepage.
I intend to post some more articles in the future that showcase some other new features in the r223 release, so you can expect some more goodies soon :)

Monday, December 22, 2014

A short tutorial on the esoreader module

This post explains how to use the esoreader, a python module for parsing the .eso file produced by EnergyPlus. It also includes a small (incomplete) reverse engineering of the .eso file format.
EnergyPlus is a whole building simulation tool EnergyPlus is a whole building energy simulation program that engineers, architects, and researchers use to model energy and water use in buildings. The .eso file is the main output file produced by EnergyPlus and is normally parsed by tools that come with the EnergyPlus suit of tools. The esoreader module lets you read in the time series data in python scripts, which for my research is quite useful. I published the module thinking other people might want to do so too.
Last week I got an email about how the documentation on the pypi page for the esoreader module is rather… terse. So I went to check the esoreader page and yes, there is not a lot of documentation. The example code I published was this:
import esoreader
PATH_TO_ESO = r'/Path/To/EnergyPlus/Output/eplusout.eso'
dd, data = esoreader.read(PATH_TO_ESO)
frequency, key, variable = dd.find_variable(
    'Zone Ventilation Total Heat Loss Energy')[0]
idx = dd.index[frequency, key, variable]
time_series = data[idx] 
What can I say? There is not much more you can do with esoreader. I think the best way to understand the module is to look at the .eso file format:
The eso file format starts of with a header section called the “data dictionary” (I used the variable dd in the example code for that). The first few lines of a sample eso file look something like this:
Program Version,EnergyPlus-Windows-32 8.1.0.009, YMD=2014.03.20 14:18
1,5,Environment Title[],Latitude[deg],Longitude[deg],Time Zone[],Elevation[m]
2,6,Day of Simulation[],Month[],Day of Month[],DST Indicator[1=yes 0=no],Hour[],StartMinute[],EndMinute[],DayType
3,3,Cumulative Day of Simulation[],Month[],Day of Month[],DST Indicator[1=yes 0=no],DayType  ! When Daily Report Variables Requested
4,2,Cumulative Days of Simulation[],Month[]  ! When Monthly Report Variables Requested
5,1,Cumulative Days of Simulation[] ! When Run Period Report Variables Requested
6,1,DEFAULT_ZONE,Zone Outdoor Air Drybulb Temperature [C] !TimeStep
99,1,DPVWALL:1157026,Surface Outside Face Temperature [C] !TimeStep
100,1,DPVWINDOW:COMBINED:DPVWALL:1157026:DEFAULTWINDOWCONSTRUCTION,Surface Outside Face Temperature [C] !TimeStep
101,1,DPVWALL:1157027,Surface Outside Face Temperature [C] !TimeStep
102,1,DPVWINDOW:COMBINED:DPVWALL:1157027:DEFAULTWINDOWCONSTRUCTION,Surface Outside Face Temperature [C] !TimeStep
103,1,DPVWALL:1157028,Surface Outside Face Temperature [C] !TimeStep
104,1,DPVWINDOW:COMBINED:DPVWALL:1157028:DEFAULTWINDOWCONSTRUCTION,Surface Outside Face Temperature [C] !TimeStep
105,1,DPVWALL:1157029,Surface Outside Face Temperature [C] !TimeStep
106,1,DPVWINDOW:COMBINED:DPVWALL:1157029:DEFAULTWINDOWCONSTRUCTION,Surface Outside Face Temperature [C] !TimeStep
107,1,DPVFLOOR:1157042,Surface Outside Face Temperature [C] !TimeStep
108,1,DPVROOF:1157058.0,Surface Outside Face Temperature [C] !TimeStep
109,1,DPVROOF:1157058.1,Surface Outside Face Temperature [C] !TimeStep
110,1,DPVROOF:1157058.2,Surface Outside Face Temperature [C] !TimeStep
111,1,DPVROOF:1157058.3,Surface Outside Face Temperature [C] !TimeStep
112,1,DEFAULT_ZONE,Zone Mean Air Temperature [C] !TimeStep
278,1,DEFAULT_ZONEZONEHVAC:IDEALLOADSAIRSYSTEM,Zone Ideal Loads Zone Total Heating Energy [J] !TimeStep
279,1,DEFAULT_ZONEZONEHVAC:IDEALLOADSAIRSYSTEM,Zone Ideal Loads Zone Total Cooling Energy [J] !TimeStep
End of Data Dictionary
The first line is stored in the DataDictionary object (dd) as version and timestamp. After that, each line represents a variable being reported. Each such variable has an index, a number of values being reported and then a reporting frequency. Well… the first few lines (indexes 1 through 5) are a bit special and I just discard them. The rest of the data dictionary lines are built like this:
  • index (e.g. 100)
  • column count (is always one as far as I can tell)
  • key (the same variable can be measured for different keys, as per the Output:Variable object in the IDF file)
    (e.g. “DPVWINDOW:COMBINED:DPVWALL:1157026:DEFAULTWINDOWCONSTRUCTION”, a surface name in one of my models)
  • variable name (e.g. “Surface Outisde Face Temperature”)
  • unit (e.g. “C”)
  • reporting frequency (e.g. “TimeStep”)
These get parsed into a DataDictionary object and stored in the attributes variables and index.
variables = dict of ids, int => [reporting_frequency,
                                 key, variable, unit]

index = dict {(key, variable, reporting_frequency) => id)}
here is an example (I’m using the IPython shell, in case you’re wondering about the In [71] line - check it out! it is awesome!!)
In [71]: dd.variables.items()[1]
Out[71]:
(100,
 ['TimeStep',
  'DPVWINDOW:COMBINED:DPVWALL:1157026:DEFAULTWINDOWCONSTRUCTION',
  'Surface Outside Face Temperature',
  'C'])
The DataDictionary object has a method find_variable. Say, you want to find the variable for ‘Zone Mean Air Temperature’:
In [75]: dd.find_variable('Zone Mean Air Temperature')
Out[75]: [('TimeStep', 'DEFAULT_ZONE', 'Zone Mean Air Temperature')]
Notice how the result is a list? If you had looked for surface temperatures instead:
In [76]: dd.find_variable('surface')
Out[76]:
[('TimeStep', 'DPVROOF:1157058.1', 'Surface Outside Face Temperature'),
 ('TimeStep', 'DPVWALL:1157029', 'Surface Outside Face Temperature'),
 ('TimeStep',
  'DPVWINDOW:COMBINED:DPVWALL:1157029:DEFAULTWINDOWCONSTRUCTION',
  'Surface Outside Face Temperature'),
 ('TimeStep', 'DPVWALL:1157028', 'Surface Outside Face Temperature'),
 ('TimeStep', 'DPVROOF:1157058.3', 'Surface Outside Face Temperature'),
 ('TimeStep', 'DPVROOF:1157058.0', 'Surface Outside Face Temperature'),
 ('TimeStep',
  'DPVWINDOW:COMBINED:DPVWALL:1157028:DEFAULTWINDOWCONSTRUCTION',
  'Surface Outside Face Temperature'),
 ('TimeStep',
  'DPVWINDOW:COMBINED:DPVWALL:1157026:DEFAULTWINDOWCONSTRUCTION',
  'Surface Outside Face Temperature'),
 ('TimeStep', 'DPVWALL:1157027', 'Surface Outside Face Temperature'),
 ('TimeStep',
  'DPVWINDOW:COMBINED:DPVWALL:1157027:DEFAULTWINDOWCONSTRUCTION',
  'Surface Outside Face Temperature'),
 ('TimeStep', 'DPVFLOOR:1157042', 'Surface Outside Face Temperature'),
 ('TimeStep', 'DPVWALL:1157026', 'Surface Outside Face Temperature'),
 ('TimeStep', 'DPVROOF:1157058.2', 'Surface Outside Face Temperature')]
you’d have gotten a list of all variables that match ‘surface’ (case-insensitive, substring match). The tuples define the variable you’re looking for: Frequency, key and variable name, since you can have the same variable output for different frequencies and keys!
So the index of the variable we’re looking for (Zone Mean Air Temperature) can be found like this:
In [77]: dd.index['TimeStep', 'DEFAULT_ZONE', 'Zone Mean Air Temperature']
Out[77]: 112
When you parse an .eso file, you get two values back: The DataDictionary and the data itself, which is stored in a simple dictionary mapping the variable index to the timeseries data:
In [82]: dd, data = esoreader.read('RevitToCitySim_fmibeta.eso')

In [84]: data[112]
Out[84]:
[19.9999999999999,
 20.0,
 20.0,
 20.0,
 20.0,
 20.0,
 20.0,
Where does that data come from? From the rest of the .eso file, which looks like this:
1,Zuerich-SMA - - TMY2-66600 WMO#=,  47.38,   8.57,   1.00, 556.00
2,1, 1, 1, 0, 1, 0.00,60.00,Tuesday        
6,-9.733141026918536E-003
99,4.22860281958676
100,2.29752216466107
101,4.62549195332972
102,2.48360878690238
103,4.45346228786434
104,2.40363283464546
105,4.29531948374435
106,2.37522804444541
107,18.
108,4.50377052140968
109,4.62335191215081
110,4.38341749556803
111,4.62165617120029
112,19.9999999999999
278,69070426.0448551
279,2.200249582529068E-006
2,1, 1, 1, 0, 2, 0.00,60.00,Tuesday        
6,-20.0097331410269
99,-3.72067959222121
100,-11.9333570144822
101,-3.2185453285921
102,-11.9539672821419
103,-3.21604754356428
104,-11.6999602208759
105,-3.69978393125912
106,-12.1422252778574
107,18.
108,-0.183133489472591
109,0.134352957894094
110,-0.291113509003108
111,9.541793763769267E-002
112,20.
278,12241499.5530833
279,0.0
2,1, 1, 1, 0, 3, 0.00,60.00,Tuesday        
6,-20.0097331410269
99,-8.25275818278861
100,-10.9050845966823
For all the main variables (id > 5) the format is:
  • index
  • value
Thus, the data dictionary is necessary to figure out what variables (with what frequency) are being output.
To sum up the tutorial: The code on the pypi page shows you pretty much all you can do and also all you need to do to retrieve a specific timeseries from an .eso file:
  • read in the eso file to obtain the data dictionary and the data
  • find the key, frequency and variable name you need in the data dictionary (with find_variable) or by guessing from your IDF input
  • retrieve the index of that variable
  • retrieve the time series data using that index